Using Your Webmail or POP Email Service
There are two main ways to read and write emails using your standard email accounts from Harborne Web Design. Webmail can be used to access your email system using a straight-forward page on the internet. The other way is with an email client such as Microsoft Outlook to manage emails on your computer.
Why Use Webmail?
Webmail is quick, easy and accessible from almost any computer anywhere in the world. All you need is a browser like Chrome, Firefox, Safari or Internet Explorer. Webmail for your domain isn’t as highly configurable as an email client and your storage is rather limited – usually 100MB – compared to the GigaBytes that your computer or premium email account has. Most businesses use webmail only when they are away from the office or their mobile devices.
Why Use An Email Client For POPmail?
Email clients such as Outlook, Windows Live Mail etc are the best way to manage one or more standard email accounts on a computer. Using POPmail You can store as many emails as your computer can fit on your hard-disk and apply powerful sets of rules to automatically file emails and often customise spam filters better than you can with webmail. The only downside of POPmail is the flipside of its main selling point. Your emails are stored on your computer and so if it breaks (or your emails become corrupted) and you haven’t backed up your emails, your archived emails are at risk. The ultimate solution is to go for a premium IMAP email account.
IMAP With A Premium Email Account
Unfortunately, IMAP email is not recommended using a standard email account. The 100MB allowance is a little too small for the amount of emails you will accrue over the years and our server is not configured to use it reliably. Harborne Web Design offer a premium IMAP email service which utilises Rackspace, a well-regarded IMAP email host based in the UK.
For a one-off setup fee, we can link your domain to a high capacity IMAP email server (with a very low monthly cost) which brings you 25GB+ of email storage and the ability to synchronise emails across all of your computers and locations. Of course you also have access to your emails via a webmail page. Click here for set-up details or call us for more details.
How Do I Use Webmail?
To access your mailbox through webmail, do any of the following:
- In a Web browser, visit the URL webmail.example.com, where example.com is the Internet address of your website. When prompted, specify your full e-mail address as the username (for example, mail@example.com), and specify the password that you use for logging in to the Panel.
- When logged in to the Panel, click the Mail tab, and in the list of e-mail addresses, click an icon
 corresponding to the e-mail address you need.
How Do I Set Up My POP Mail Account?
That depends to an extent on which mail client you are planning to use.
We offer set-up information for Outlook, Thunderbird and Mac Mail
To set up Microsoft Office Outlook 2010:
- Open Microsoft Office Outlook.
- Go to File > Info > Account Settings.
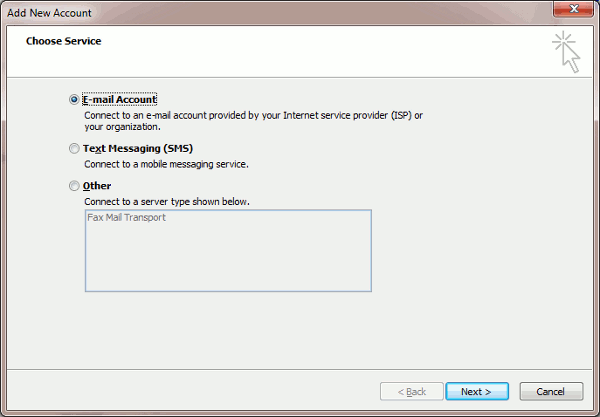
- On the E-mail tab, click New.
- Leave the option E-mail Account selected. Click Next.
- Select the checkbox Manually configure server settings or additional server types. Click Next.
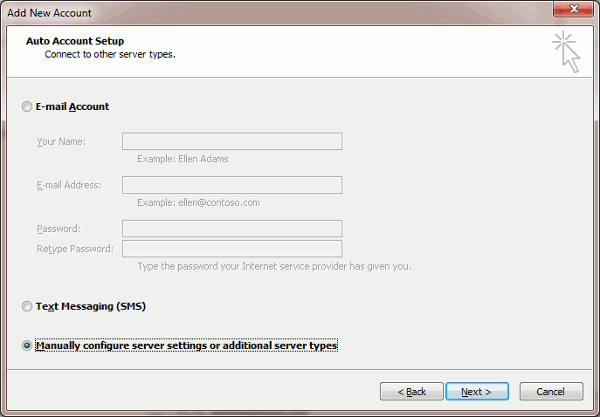
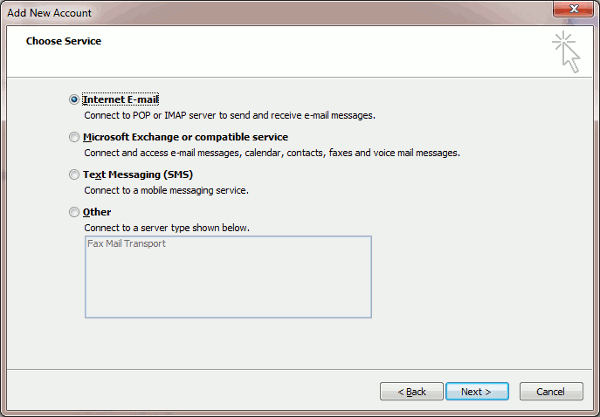
- Select the Internet E-mail option and click Next.
- Specify the following:
- Your name.
- Your e-mail address.
- Account type. DO NOT select the IMAP option, DO select the POP3 option.
- Incoming mail server. Type your domain name. For example, example.com.
- Outgoing mail server. Type your domain name. For example, example.com.
- Username for logging in to the mailbox. Specify your full e-mail address.
- Password for logging in to the mailbox.

-
- Click the button marked ‘More Settings’
- On the Outgoing Server tab, choose ‘My outgoing server (SMTP) requires authentication’.
- Select the radio button next to ‘Use same settings as my incoming server’
- Click the Advanced tab
- Clear the checkbox marked ‘Leave a copy of messages on the server’
- Click the OK button
- Click Next.
- Click Finish.
Access from Mozilla Thunderbird
The instructions provided in this section were verified against Mozilla Thunderbird 3. They might not work with earlier or later versions of Mozilla Thunderbird.
To set up Mozilla Thunderbird:
- Open Mozilla Thunderbird.
- Go to File > New > Mail Account.
- Specify the following:
- Your name, as you want it to appear in any messages you send.
- Your e-mail address and password.
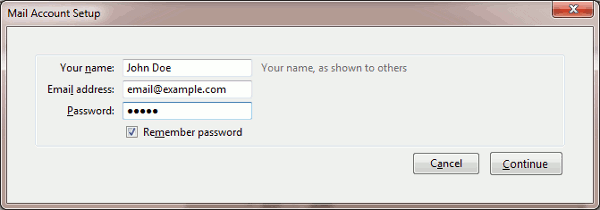
- Click Continue.
- If Thunderbird fails to find the settings automatically, specify the following:
- Protocol of your incoming mail server.Select the POP3 option. DO NOT SELECT IMAP.
- Incoming server address. Specify your website’s Internet address.
- Outgoing server address. Specify your website’s Internet address.
- Click Manual Setup
- Make sure that Outgoing Mail Server uses authentication (log in using same details as incoming server)
- Ensure that ‘Leave a copy of messages on the server’ is CLEARED and NOT CHECKED.
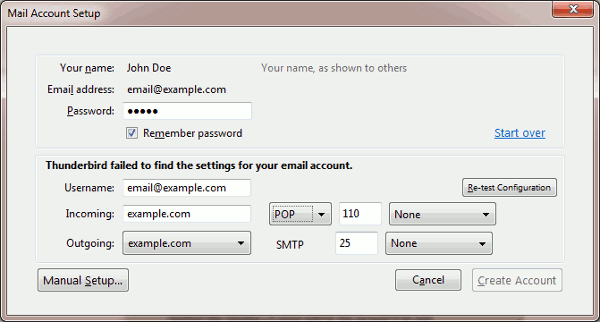
- Click OK then Create Account.
Access from Apple Mail
The instructions provided in this section were verified against Apple Mail 3.6 (Leopard). They might not work with earlier or later versions of Apple Mail.
To set up Apple Mail:
- Run Apple Mail.If you run it for the first time and do not have any mail accounts configured in it, skip the next step: Apple Mail will take you directly to creating one.
- Open the Adding Mail Account wizard:
- Click Mail > Preferences….
- Select the Accounts tab.
- Click the + button at the bottom left corner.
- Enter the account information:
- Your full name
- Your full e-mail address
- The password you use to log in to the Panel.
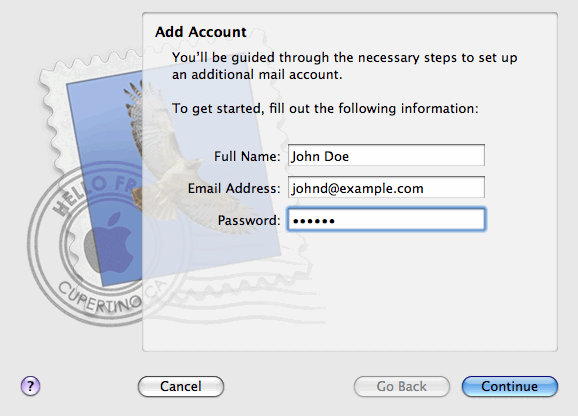
- Click Continue.
- Fill in the following incoming mail server information:
- Account Type: select POP protocol – DO NOT select IMAP!
- Incoming Mail Server: type in the name of domain which serves your mail (which follows the @ sign in your e-mail address).
- User Name: enter your full e-mail address.
- Password: leave it auto-completed (Apple Mail takes it from the previous step).
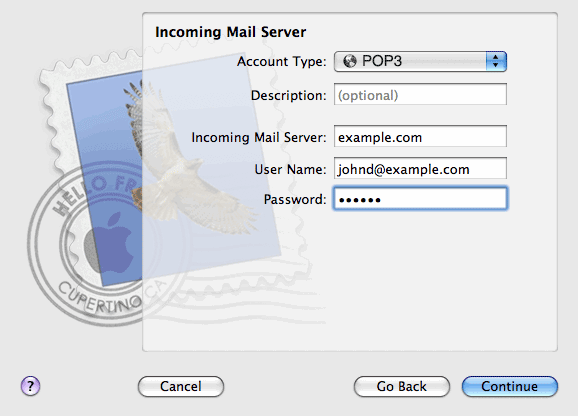
- Click Continue.
- (Optional) Specify the incoming mail security options:Apple Mail displays this setup screen only if a mail server bundled with Parallels Small Business Panel supports SSL for the selected account type POP.
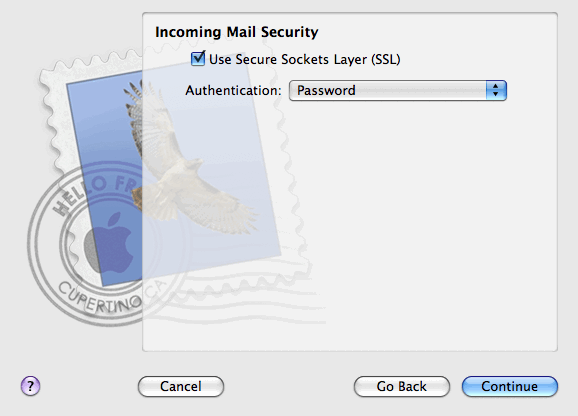
- Select the Use Secure Sockets Layer (SSL) checkbox.
- Select the authentication method.Keep the default method if you are not sure which to select.
- Click Continue.
- Fill in the following outgoing mail server information:
- Outgoing Mail Server: type in the name of domain which serves your mail (which follows the @ sign in your e-mail address).
- Use only this server: selected.
- Use Authentication: selected.
- User Name: enter your full e-mail address.
- Password: leave it auto-completed (Apple Mail takes it from the previous step).
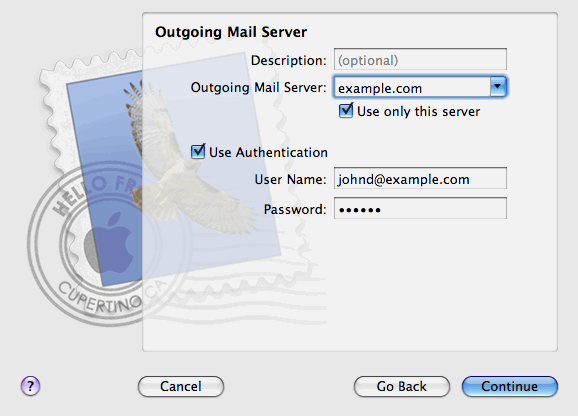
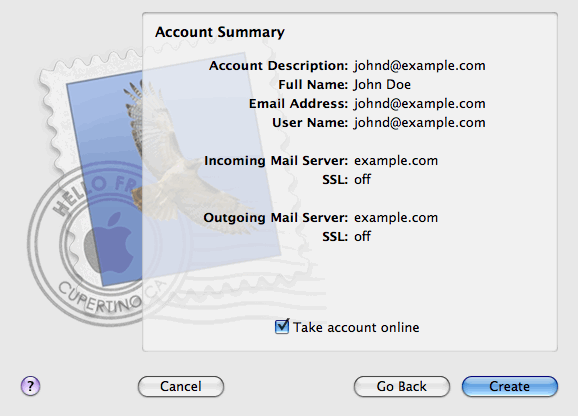
- Click Continue.Apple Mail displays overall description of the mail account that is going to be created.
- Ensure that ‘leave messsages on the server’ is not checked
- Make sure that Outgoing mail server authentication is turned on and using the same settings as the incoming mail server.
- Select the Take account online checkbox and click Create.